Installing Oracle 11gR2 on RHEL5
Here I am installing oracle 11g release 2 on RHEL5 using vmware workstation. This document is for learning purpose only as you have to adjust some parameter values and other options while installing in real time environment.The steps for installing oracle software are
- Guest Operating system installation.
- Requirements check.
- Prerequisites for installing oracle software.
- Install the oracle software and Create a database using DBCA.
Guest Operating system installation
Here I created a vmware virtual machine for OS and oracle software installation.click here for RHEL5 installation steps.
Requirements check :
- We need atleast 1gb of ram memory for the linux machine.
- The swap space should be atleast 1.5 times the ram size(for ram size b/n 1gb to 2 gb).
- The /tmp mount should have atleast 1gb of space available.
- Check the free space of the mount points where we are installing oracle software and the database files.
- Check the linux kernel version, the kernel version for installing oracle 11gR2 should be equal to or greater than 2.6.18.
To check ram and swap memory
[root@test ~]# free -mtotal used free shared buffers cached
Mem: 1010 458 551 0 31 317
-/+ buffers/cache: 109 901
Swap: 2596 0 2596
[root@test ~]#
To check /tmp space
[root@test ~]# df -h /tmpFilesystem Size Used Avail Use% Mounted on
/dev/sda5 3.9G 36M 3.8G 1% /tmp
[root@test ~]#
To check /u01 mount space where the oracle software and database files will be installed.
[root@test ~]# df -h /u01Filesystem Size Used Avail Use% Mounted on
/dev/sda6 14G 163M 13G 2% /u01
[root@test ~]#
To check the linux kernel version.
[root@test ~]# uname -r
2.6.18-274.el5
[root@test ~]#
Prerequisites for installing oracle software.
Add an entry of ip address,fully qualified name and machine name in /etc/hosts
[root@test ~]# cat /etc/hosts# Do not remove the following line, or various programs
# that require network functionality will fail.
127.0.0.1 test.localdomain test localhost.localdomain localhost
::1 localhost6.localdomain6 localhost6
192.168.1.192 test.localdomain test
[root@test ~]#
Add the following lines in /etc/sysctl.conf
Some entries may already existing in this linux kernel configuration file. If the given value is greater than the existing value for any parameter, we have to adjust it to the greater value otherwise we can ignore it.
fs.aio-max-nr = 1048576
fs.file-max = 6815744
kernel.shmall = 2097152
kernel.shmmax = 536870912
kernel.shmmni = 4096
kernel.sem = 250 32000 100 128
net.ipv4.ip_local_port_range = 9000 65500
net.core.rmem_default = 262144
net.core.rmem_max = 4194304
net.core.wmem_default = 262144
net.core.wmem_max = 1048586
net.ipv4.tcp_wmem = 262144 262144 262144
net.ipv4.tcp_rmem = 4194304 4194304 4194304
To make effect the kernel parameters changes immediately
[root@test ~]# /sbin/sysctl -p
Create OS user (oracle software owner) and groups needed to install oracle software.
[root@test ~]# groupadd dba[root@test ~]# groupadd oinstall
[root@test ~]# groupadd oper
[root@test ~]# useradd -g oinstall -G dba,oper oracle
[root@test ~]# passwd oracle
Changing password for user oracle.
New UNIX password:
BAD PASSWORD: it is based on a dictionary word
Retype new UNIX password:
passwd: all authentication tokens updated successfully.
[root@test ~]#
Create a directory where oracle software will be installed and provide the necessary ownership and privileges.
[root@test ~]# mkdir -p /u01/app/oracle/product/11.2.0/db_1[root@test ~]# chown -R oracle:oinstall /u01
[root@test ~]# chmod -R 775 /u01
[root@test ~]#
Set the shell limits in /etc/security/limits.conf for the oracle owner
oracle soft nproc 2047
oracle hard nproc 16384
oracle soft nofile 1024
oracle hard nofile 65536
Add the following line to /etc/pam.d/login if the same is not there
session required pam_limits.so
Check the /etc/selinux/config to see whether the selinux parameter is disabled.
SELINUX=disabled
Verify that the required rpm packages are installed for oracle
Mount the RHEL5 dvd or it's corresponsing iso image, go to /media/RHEL_5.7 i386 DVD/Server directory and give the below commands. By using "rpm -Uvh <package name>" command, the packages will be installed if it is not prevously installed
rpm -Uvh binutils-2*
rpm -Uvh compat-libstdc++-33*
rpm -Uvh elfutils-libelf-0*
rpm -Uvh elfutils-libelf-devel-0*
rpm -Uvh elfutils-libelf-devel-static-0*
rpm -Uvh gcc-4*
rpm -Uvh gcc-c++-4*
rpm -Uvh glibc-2*`uname -p`*
rpm -Uvh glibc-common-2*
rpm -Uvh glibc-devel-2*
rpm -Uvh glibc-headers-2*
rpm -Uvh kernel-headers-2*
rpm -Uvh ksh-20*
rpm -Uvh libaio-0*
rpm -Uvh libaio-devel-0*
rpm -Uvh libgcc-4*
rpm -Uvh libgomp-4*
rpm -Uvh libstdc++-4*
rpm -Uvh libstdc++-devel-4*
rpm -Uvh make-3*
rpm -Uvh numactl-devel-0*
rpm -Uvh sysstat-7*
rpm -Uvh unixODBC-2*
rpm -Uvh unixODBC-devel-2*
rpm -Uvh compat-libstdc++-33*
Give access to oracle user for using X server which is needed to run oracle universal installer
[root@test ~]# xhost +SI:localuser:oracle
localuser:oracle being added to access control list
[root@test ~]#
Add the following lines to .bash_profile file.
switch to oracle user and add the following entries.
# Oracle settings
TMP=/tmp; export TMP
TMPDIR=$TMP; export TMPDIR
ORACLE_HOSTNAME=test.localdomain; export ORACLE_HOSTNAME
ORACLE_BASE=/u01/app/oracle; export ORACLE_BASE
ORACLE_HOME=$ORACLE_BASE/product/11.2.0/db_1; export ORACLE_HOME
ORACLE_SID=testdb; export ORACLE_SID
ORACLE_TERM=xterm; export ORACLE_TERM
PATH=$ORACLE_HOME/bin:/usr/sbin:$PATH; export PATH
LD_LIBRARY_PATH=$ORACLE_HOME/lib:/lib:/usr/lib;
export LD_LIBRARY_PATH
CLASSPATH=$ORACLE_HOME/JRE:$ORACLE_HOME/jlib:$ORACLE_HOME/rdbms/jlib;
export CLASSPATH
if [ $USER = "oracle" ]; then
if [ $SHELL = "/bin/ksh" ]; then
ulimit -p 16384
ulimit -n 65536
else
ulimit -u 16384 -n 65536
fi
fi
Run the following command to make the given changes effective.
[oracle@test ~]$ source ~/.bash_profile
[oracle@test ~]$
Install the oracle software and create a database using DBCA.
Now the system is ready to install oracle software.
Login as oracle user, download/copy the oracle 11gR2 software and unzip the media file.A folder named "database" will be created, go to the database folder and execute the "runInstaller" script to start oracle universal installer.
total 40
-rwxr-xr-x 1 oracle oinstall 4352 Aug 14 2009 runInstaller
drwxr-xr-x 4 oracle oinstall 4096 Aug 14 2009 install
drwxr-xr-x 2 oracle oinstall 4096 Aug 14 2009 rpm
drwxr-xr-x 14 oracle oinstall 4096 Aug 14 2009 stage
drwxrwxr-x 2 oracle oinstall 4096 Aug 14 2009 sshsetup
drwxrwxr-x 2 oracle oinstall 4096 Aug 14 2009 response
drwxr-xr-x 12 oracle oinstall 4096 Aug 17 2009 doc
-rw-r--r-- 1 oracle oinstall 5400 Aug 18 2009 welcome.html
[oracle@test database]$ ./runInstaller -ignoreSysprereqs

Login as oracle user, download/copy the oracle 11gR2 software and unzip the media file.A folder named "database" will be created, go to the database folder and execute the "runInstaller" script to start oracle universal installer.
Start the oracle universal installer.
oracle@test database]$ ls -lrttotal 40
-rwxr-xr-x 1 oracle oinstall 4352 Aug 14 2009 runInstaller
drwxr-xr-x 4 oracle oinstall 4096 Aug 14 2009 install
drwxr-xr-x 2 oracle oinstall 4096 Aug 14 2009 rpm
drwxr-xr-x 14 oracle oinstall 4096 Aug 14 2009 stage
drwxrwxr-x 2 oracle oinstall 4096 Aug 14 2009 sshsetup
drwxrwxr-x 2 oracle oinstall 4096 Aug 14 2009 response
drwxr-xr-x 12 oracle oinstall 4096 Aug 17 2009 doc
-rw-r--r-- 1 oracle oinstall 5400 Aug 18 2009 welcome.html
[oracle@test database]$ ./runInstaller -ignoreSysprereqs
Configure security updates :
Enter the credentials like email id and My oracle support password.For learning purpose,you can ignore this options. Click next button.

Installation option
select "create and configure a database" option if you want to create a database along with software installation. Click next button.

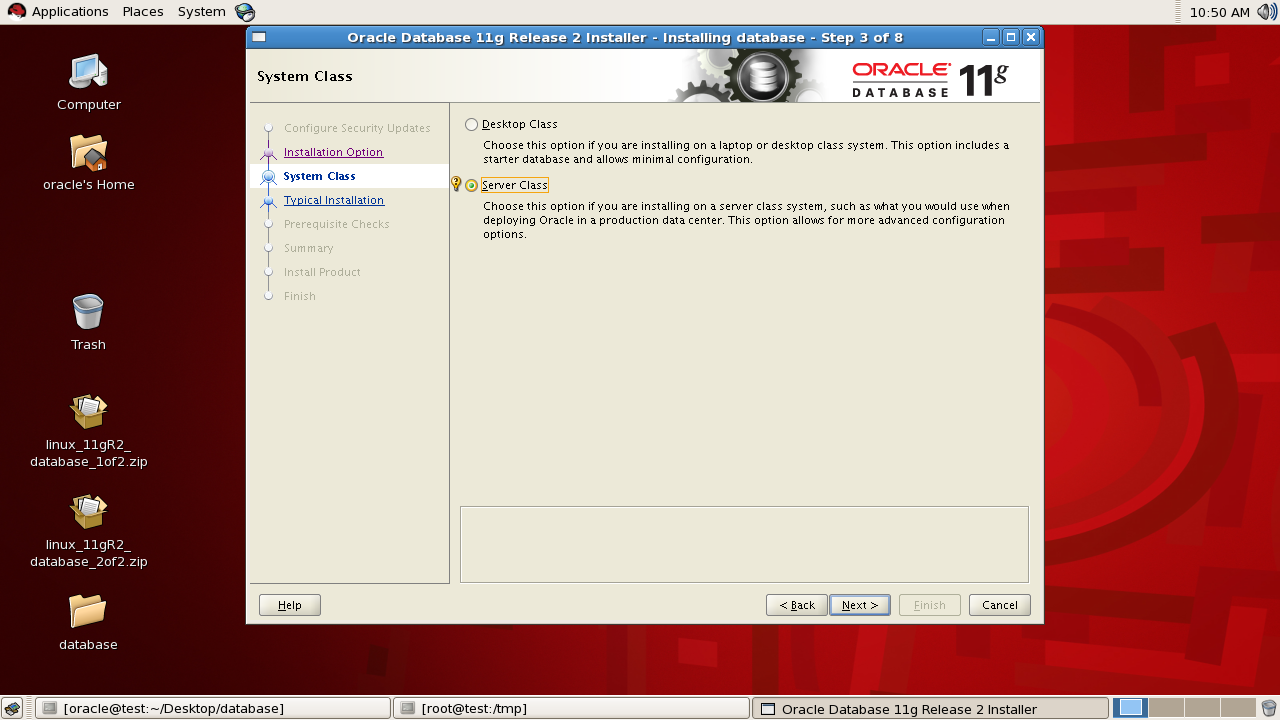
System class
select the "server class" for more advanced configuration option and Click next button
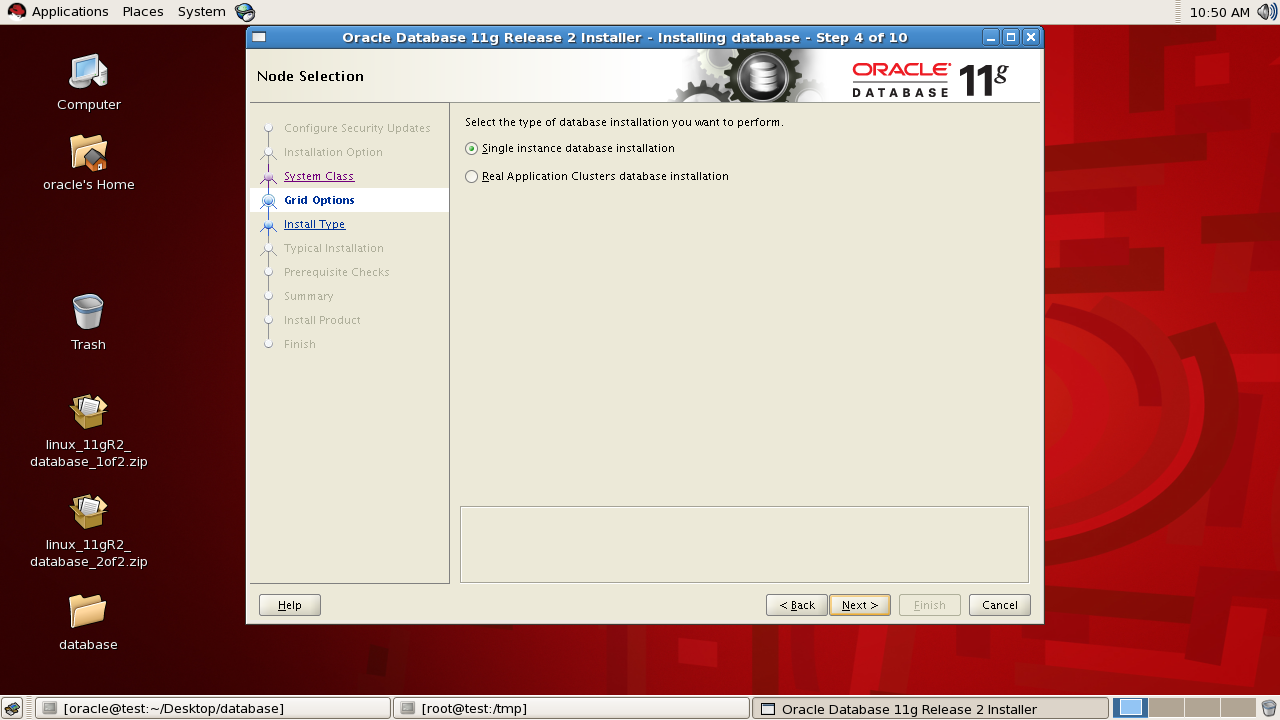
Grid option:
Select "single instance" or "Real application clusters" database installation. Click next button.
Install type:
Select "Typical install" option and click next button.

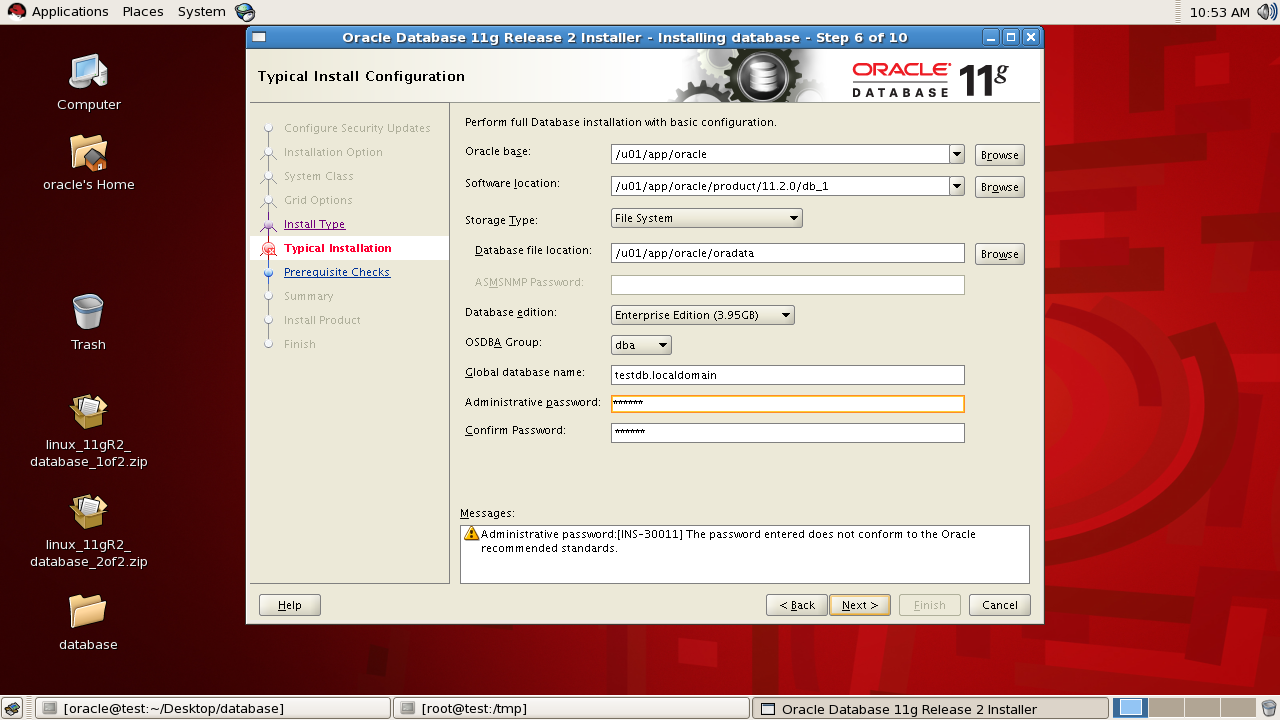
Typical installation:
Provide the global database name and administrative password. Also check other prepopulated entries. After verifying the entries click the next button.
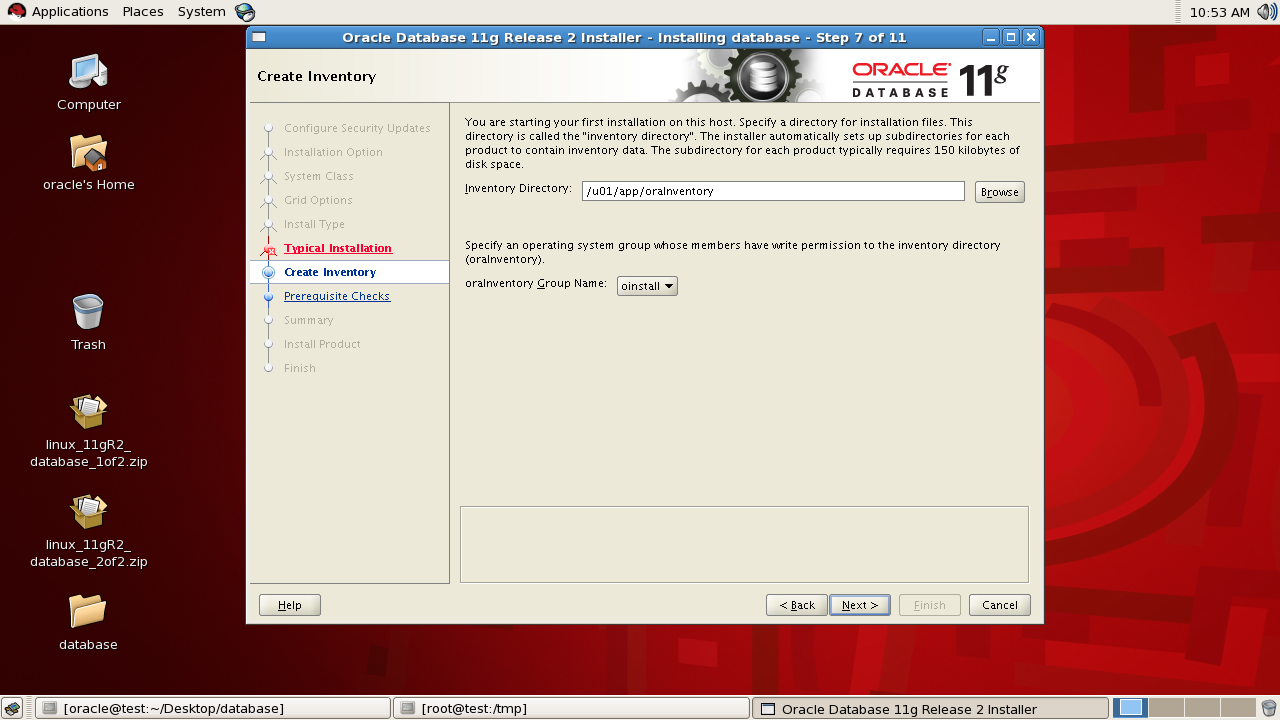
Create inventory:
Verify the prepopulated inventory directory and it's group name and click the next button.
Prerequisite checks:
Proceed only after confirming all the prerequisite checks are succeeded.

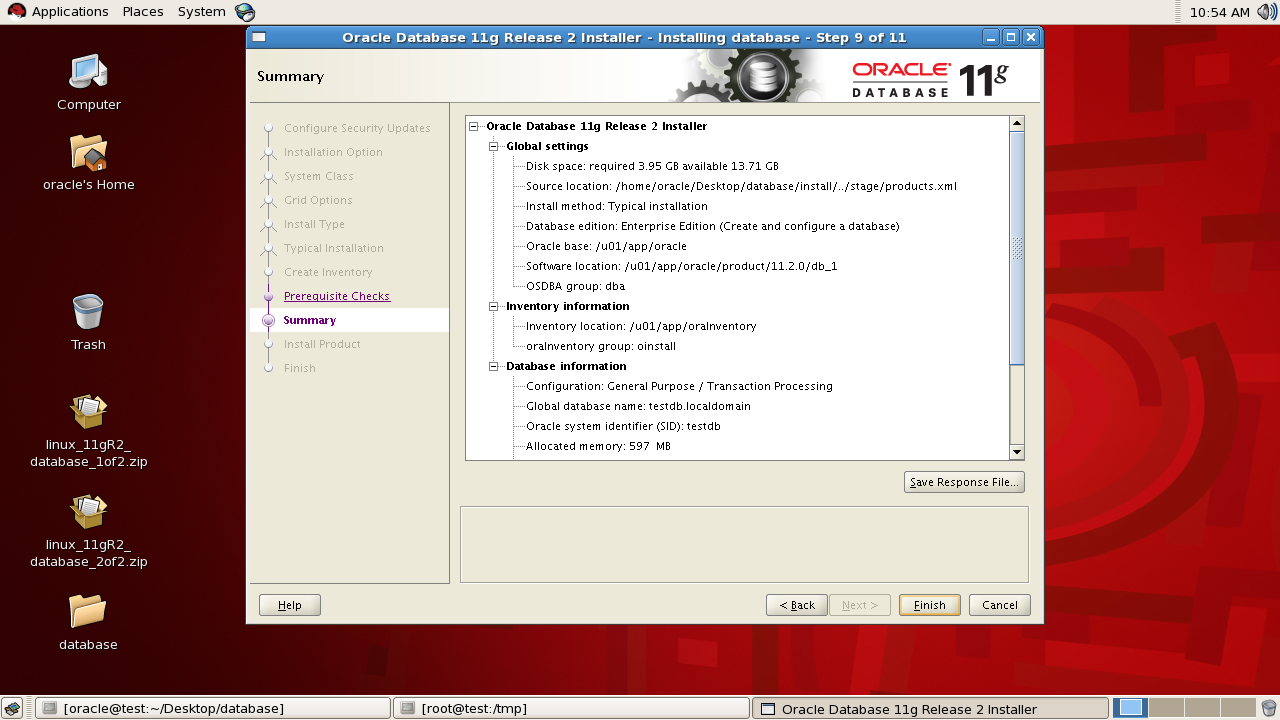
Summary:
Go through the configuration summary and click the finish button.
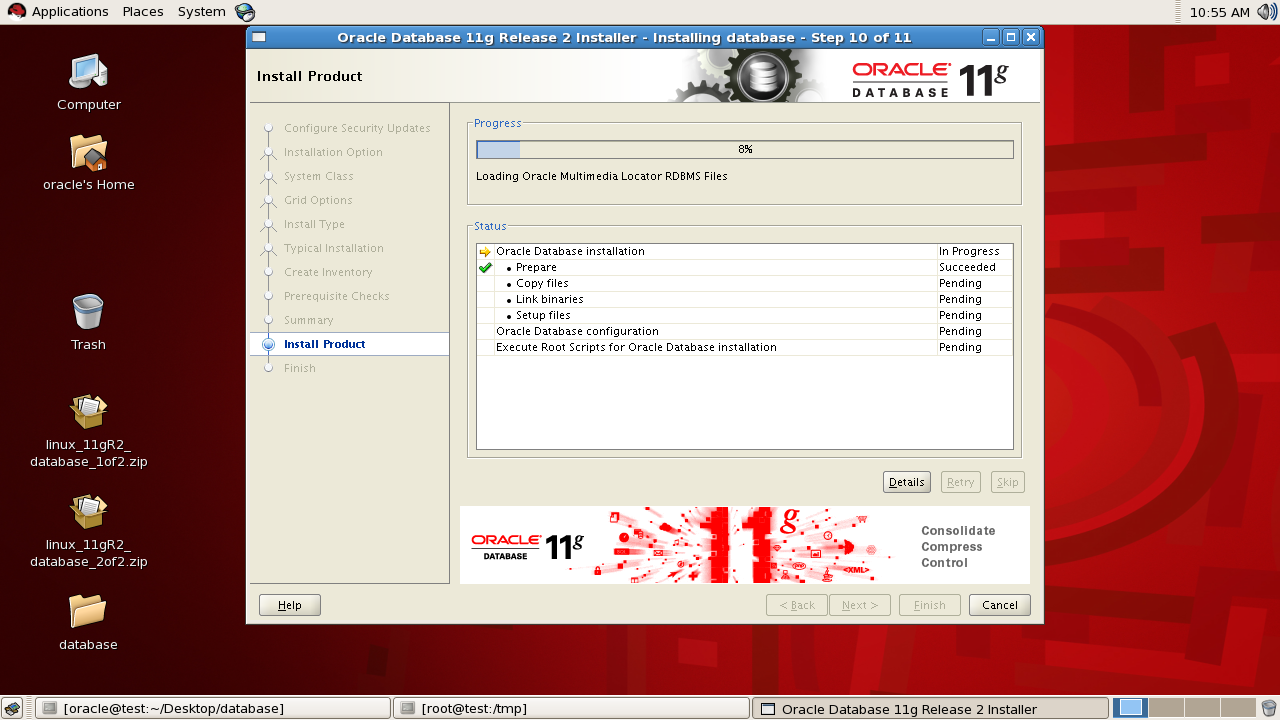
Install product:
Wait for installation of all the products to complete.
Starts Database configuration Assistant:
If we had opted to create a database, then dbca will starts automatically after completing the product installation.


Click ok
Execute configuration scripts:
Execute both the scripts by login as root user and after successful completion click the ok button.

[oracle@test dbs]$ su -
Password:
[root@test ~]#
[root@test ~]# /u01/app/oraInventory/orainstRoot.sh
Changing permissions of /u01/app/oraInventory.
Adding read,write permissions for group.
Removing read,write,execute permissions for world.
Changing groupname of /u01/app/oraInventory to oinstall.
The execution of the script is complete.
[root@test ~]#
[root@test ~]#
[root@test ~]# /u01/app/oracle/product/11.2.0/db_1/root.sh
Running Oracle 11g root.sh script...
The following environment variables are set as:
ORACLE_OWNER= oracle
ORACLE_HOME= /u01/app/oracle/product/11.2.0/db_1
Enter the full pathname of the local bin directory: [/usr/local/bin]:
Copying dbhome to /usr/local/bin ...
Copying oraenv to /usr/local/bin ...
Copying coraenv to /usr/local/bin ...
Creating /etc/oratab file...
Entries will be added to the /etc/oratab file as needed by
Database Configuration Assistant when a database is created
Finished running generic part of root.sh script.
Now product-specific root actions will be performed.
Finished product-specific root actions.
[root@test ~]#
Finish:
Now the oracle software is successfully installed and a database named "testdb" has been created.

Verify the database details:
Login as sys user, start the database created and verify the database details.
18:20:51 SQL> show user
USER is "SYS"
18:20:59 SQL> select banner from v$version;
BANNER
--------------------------------------------------------------------------------
Oracle Database 11g Enterprise Edition Release 11.2.0.1.0 - Production
PL/SQL Release 11.2.0.1.0 - Production
CORE 11.2.0.1.0 Production
TNS for Linux: Version 11.2.0.1.0 - Production
NLSRTL Version 11.2.0.1.0 - Production
Elapsed: 00:00:00.00
18:21:06 SQL> select name from v$database;
NAME
---------
TESTDB
Elapsed: 00:00:00.00
18:21:21 SQL> select instance_name,status from v$instance;
INSTANCE_NAME STATUS
---------------- ------------
testdb OPEN
Elapsed: 00:00:00.01
18:21:32 SQL>
18:21:46 SQL>
Hi Manoj,
ReplyDeleteThanks for your post which is really helping me to setup a oracle instance in linux.. I have a confusion regarding installation of rpm packages for oracle. You have mentioned to mount the DVD software or the ISO file. I am not able to do the mounting properly, can you please explain how to do it..
Regards,
Arijit